Repairing crash data on Toyota Yaris SRS airbag module 89170-0D540 using CG70 airbag reset tool – clearing crash flags / airbag ECU reset for reuse.
Part number: 89170-0D540.
Fault code: crash event stored
Auto repair and crash crash on bench mode.


Repairing crash data on Toyota Yaris SRS airbag module 89170-0D540 using CG70 airbag reset tool – clearing crash flags / airbag ECU reset for reuse.
Part number: 89170-0D540.
Fault code: crash event stored
Auto repair and crash crash on bench mode.
CG100X programmer released new software V2.1.3.0 on July 27th, 206.
The following models are added for Body repair:
Land Rover JPLA-19H440-DE RFA SPC560B60L3
Land Rover K8D2-10C784-XX 48V Lithium battery 9S12ZVCA19V(ON25N)
The following models are added for airbag:
BYD AUTO STHZA-3658100 95128
BYD AUTO HA2EJ-3658100B 95128
BYD AUTO 3658100-RM01 95128+SPC560P40L1
The following models are added for read-write:
DongFeng Nano01 2024-93C86(read write)
DongFeng U400014160 95320(read write)
Land Rover BCM BCM MPC5748G(read write)
Land Rover BCM BCM MPC5746C(read write)
Maserati Lai Wante 2018-95320(read write)
NETA S37-3658010AB 95320(read write)
YeMa SiPaiKa PIC18F46K80(read write)
Trumpchi E9 R7F701651(Multimedia Head Unit)(encrypted)(read write)
Great Wall Haval Xiaolong 2023- R7F701651(Multimedia Head Unit)(encrypted)
The following models are added for dashboard:
BAIC X7 24C32 Instrument Cluster + 95640 Body
Benz Vites 25640
DongFeng Furuika 2022- STM32F103VE
DongFeng EV180 2023- 24LC256(Pure Electric)
DongFeng Duolika 2024- R5F10DPJ
DongFeng ChaoLong medium bus STM32F103RB
DongFeng HuashenT5 MB91F53BC
DongFeng Tianjin KR 2024- 24C32
DongFeng Fengxing SX6 9S12HA32
DongFeng Fengxing T9 24C64(Central Control Unit)
FOTON Times King Kong 726 STM8S105K4
FOTON View G7 EV 2025- 24C08
FOTON Toano Damai 24C16
HELI Forklift PIC18F4580 V2
Hongxing BOX1 2024- 24C16
Huaxia 504 Tractor 24C02
Geely Farizon E200S 24C04
CNHTC SITRAK C7H 540 R7F701441
JMC WweiLong HV5 2018- 24C04
JMC Jinhui EV48 24C256(Multimedia host)
JieFang MV131 2017- 24LC04
TODAY SUNSHINE M2 24C64
KINGLONG Bus 2025- 24C16
Liugong 835Loader 9S12XHY128
Chery Karry Dolphin E7 2024- 24C16
Chery Karry Xiaoxiang X3 24C16
Hitachi ZX220 Excavator 93C66(RL66)
Rullancar RL8 2025- 9S12XHY256
Sanyang motorcycle R5F10DME
SAIC Jiehu H6 320 93C66
WuLing Glorious new card 2025- 24C16
WuLing MINI EV Macaron 2025- 24C64
Naveco Ousheng 2025- 25160
YunDu X 24C64
CNHTC HOWO 2011- 24C256(CBUc)
CGDI has recently launched a points redemption campaign that allows customers to offset annual software upgrade fees with points.
Redemption Standard:
2,380 points = 100 USD
Accumulated points can be used to offset the upgrade fees for CG FC200 and CG100X software, covering both 1-year and half-year subscription plans.
Below are the original subscription cost compared with the points‑discounted rates. As you can see, redeeming points can significantly reduce your annual maintenance costs.
| SKU | Original Price | Points Deduction (Annual License has Expired) | Points Deduction (Early Renewal) |
| XNR-SS373 | $300 1 year | $200 | $118 |
| XNR-SS373-M6 | $174 6-month | $126.44 | $74 |
| XNR-SS374 | $260 1 year | $160 | $90 |
| XNR-SS374-M6 | $150.80 6-month | $50.8 | – |
How to transfer CGDI Points?
Points can be collected by generating new CG universal remotes using CGDI K2 key tool.
In CGDI K2, go to More Function.
Select Points Management.
Then choose Transfer Tokens.


Transfer points to this email for fee offset.
email address: misslijianhua@qq.com
Great News. CGDI FC200 All-in-One Programmer expands diesel ECU coverage now!
Supports both Gasoline & Diesel vehicles
Feature:
Compatible Diesel ECUs:
ECTEK F05/F06/F17 | Weite ECU30
Yunnei MDD02/MDD06
Nanyue ECU022/ECUR01/ECUR02/ECU435/ECU437/ECU4PH
Denso D33 / Denso 5-Pin

As titled, what is the difference between the new DB15 adapter and old DB15 harness for CG FC200 programmer?
Function:
The function of the new and old adapters is identical.
Both are used for reading and writing ECUs.
Both are equipped with BDCEF-type pins.
Appearance
Material: The material is the same for both versions.
Interface:
Old DB15:
New DB15:
The wires of the new db15 adapter interface are arranged in a row, while the old adapter interface is aggregated.
Additional Power Port:
The new harness has a DC12 power interface on the side, which can be connected to a 12V power supply (added automatic ignition line control for bench mode); the old adapter does not have this.
Wiring Changes
The new harness adds 2 wires to the original wires of the old version: an orange 12V control wire and a gray GPT-4 3.3V wire.
| Wire Color | Purpose |
|---|---|
| Orange | 12V power |
| Gray | GPT-4 (3.3V) |
Additionally, the new model also has an empty pin position for future expansion.


Orange Wire (12V Ctrl)
Example: When reading a Toyota 37840 encrypted airbag ECU, the old harness required physical disconnection and reconnection of wires during the read/write process.
With the new adapter, this repeated plugging and unplugging is no longer necessary.
Key Difference 1: 12V Power Supply Port
Under normal conditions, the FC200 does not need power from this auxiliary port.
However, if the FC200’s built-in 12V supply current is too low, some ECUs (e.g., MED, EDC types) may fail to wake up.
In such cases, you can supplement power through this external 12V port.
Important: After the launch of the new DB15 harness, subsequent software versions will only support the new harness and no longer support the old one.
Key Difference 2: Voltage Changes on GPT Lines
| Old Harness | New Harness |
|---|---|
| GPT-0 (Brown) – 5V | Replaced by GPT-3 (Blue) – 3.3V |
| GPT-2 – 5V | Changed to GPT-2 – 3.3V |
| GPT-1 (Purple) – 5V | Replaced by GPT-2 (Pink) – 3.3V |
| GPT-4 (Gray) – 3.3V (new addition) |
Critical: When wiring, you must follow the new wiring diagram for correct connections.
Key Difference 3: ST10 Series ECUs – No External Resistor Needed
No external resistor is required for voltage division. The original harness required a 1k ohm resistor; otherwise, it would fail to read or produce garbled data.
For example, SIM43, SIM2K-51.4, etc.
New harness: The resistor is no longer required. Simply connect to GPT-3 instead.
For instance, with this wiring diagram, you previously had to connect a 1k ohm resistor, but now you only need to connect GPT-3.
Finally, the upcoming BMW B48, B58, and diesel MD1CS089 encrypted ECU unlocking functions that are about to be released for the FC200 will also require the new DB15 adapter.
CGDI CG201 mileage programmer released new software V040 in July 2026.
CG201 V040
VERSION UPDATE
Supports one-click OBD mileage correction for dashboard.
Added the following Ford models:
Ford/EXPLORER (TRAC) 2007-2010 by OBD
Ford/EXPLORER 2007-2010 by OBD
Ford/NAVIGATOR 2007-2010 by OBD
Ford/EC0SP0RT 2013-Type 1/2 by OBD
Ford/FIESTA 2013-Type 1/2 by OBD
Ford/FIESTA-2012 by OBD
Ford/NEWMONDE0 2015-SPC56455+93C86 by OBD
Ford/EDGE 2014-2017 SPC56455+93C86 by OBD
Ford/EXPLORER 2015-SPC56455+93C86 by OBD
Ford/TOURNEO 2013-COURIER by OBD
Ford/TRANSIT 2013-COURIER by OBD
Ford/EDGE 2012-HYBRID by OBD
Ford/EXPEDITION 2014-D70F3423 by OBD
Ford/EXPLORER 2011 D70F3423 by OBD
Ford/EXPLORER (TRAC) 2014-D70F3423 by OBD
Ford/TAURUS 2012-HYBRID by OBD
Ford/TAURUS 2011-D70F3423 by OBD
Ford/TOURNEO 2009-D70F3421 by OBD
Ford/TOURNEO 2006-D70F3325 by OBD
Ford/TRANSIT 2009-D70F3421 by OBD
Ford/TRANSIT 2006-D70F3325 by OBD
Ford/TRANSIT 2018-Type 1 by OBD
Ford/F150 2011- by OBD
Ford/TAURUS 2011-MB91F016A by OBD
Ford/TOURNEO COURIER 2016-D70F352X by OBD
Ford/TRANSIT 2016-D70F352X by OBD
Ford/TRANSIT MK8 2016-NEC70F3525 by OBD
Added the following Lincoln models:
Lincoln/MKC 2012-HYBRID by OBD
Lincoln/MKC 2012-HYBRID by OBD
Lincoln/MKC 2011-D70F3423 by OBD
Lincoln/MKC 2011-D70F3423 by OBD
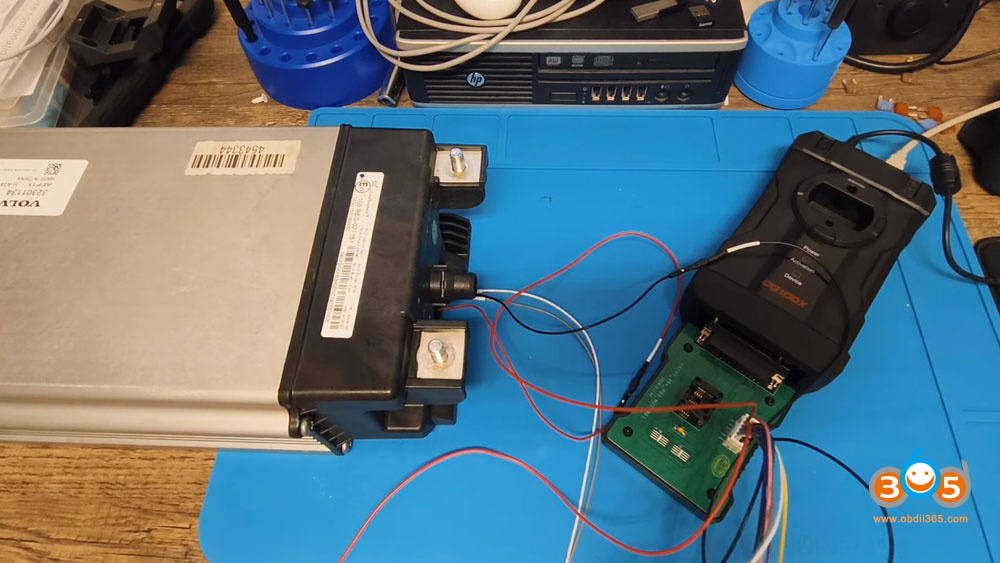
This article explores a real-world application of this programmer on a 2022 Volvo XC90 hybrid battery system, examining its functionality, limitations, and whether it's worth the investment for automotive professionals.
Model example: 2022 Volvo XC90
A 2022 Volvo XC90 involved in a front-end accident triggered the vehicle’s safety systems. When airbags deploy, the hybrid battery enters a protection mode, preventing the vehicle from starting. Even after physical repairs, the battery requires a software unlock to restore functionality.
The Procedure
Select the Volvo 48V battery option from the software menu.
CG100X will show you the wiring diagram.


Power Requirements: An important technical consideration emerged during testing. The CG100X requires precisely 12V power (2A recommended). When the technician attempted to use a 14.5-15V power supply, the programmer failed to recognize the connection. Switching to a proper 12.6V 2A charger resolved the issue.
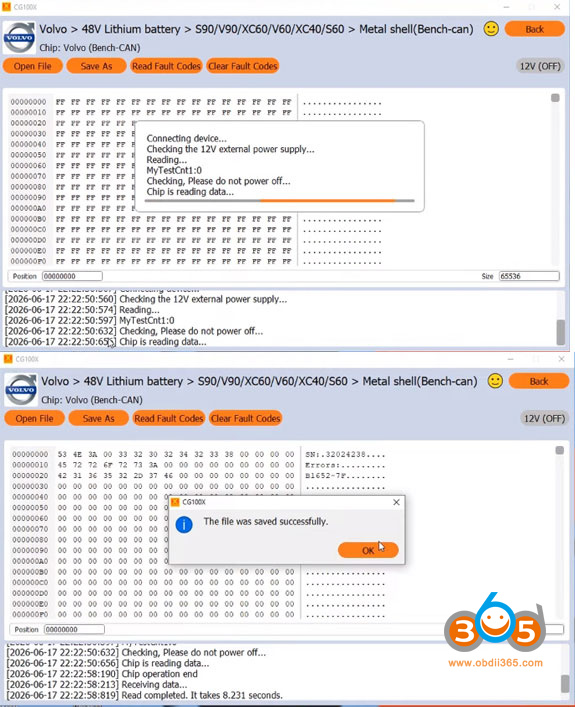
Read and save battery data.
The system reads the battery’s fault codes.
We can view serial numbers and error logs.

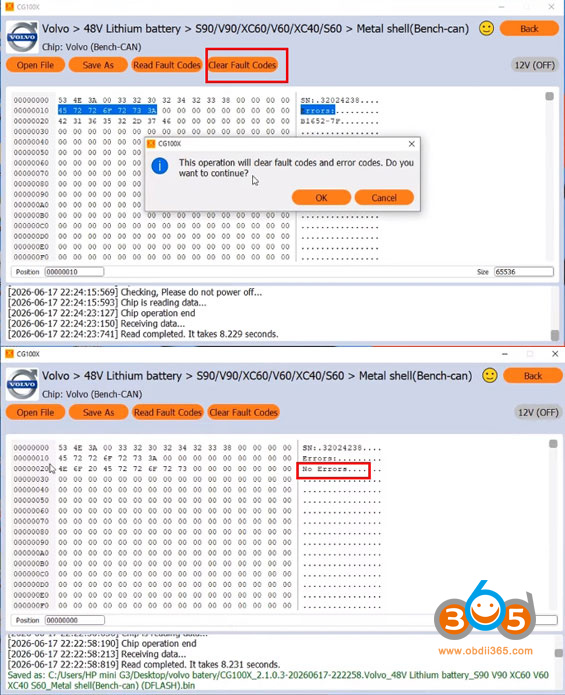
Clear fault codes.
The unlock function clears accident-related fault codes
Results
The CG100X Volvo 48V battery unlock procedure was successfully completed in seconds. Analysis of the data showed:
Original data contained accident-related error codes.
After the unlock operation, fault codes were cleared.
The battery was restored to operational status.
Final Recommendations
Check power supply requirements – Ensure you’re using a stable 12V 2A power source.
Exercise caution during connection – The stiff rubber seal can lead to bent pins.
Verify compatibility – Confirm your specific battery model is supported.
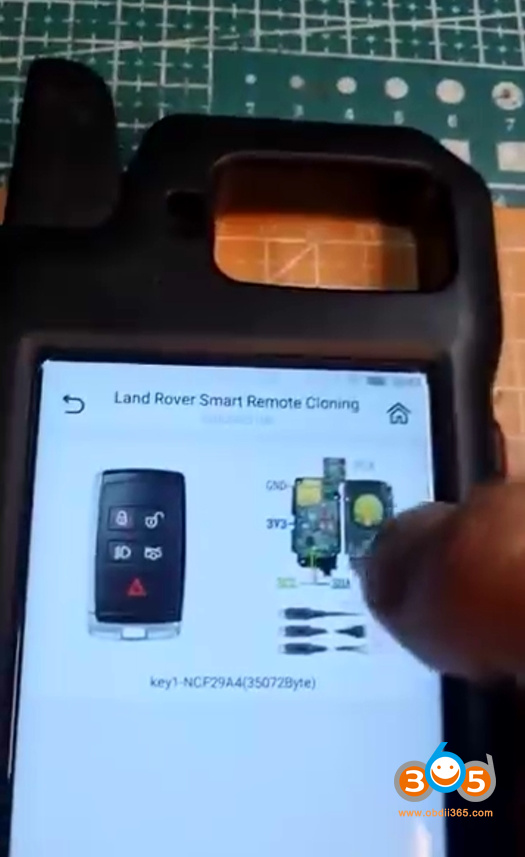
Here obdii365.com shares another way to copy a spare Land rover Hitag Pro ID49 smart key using CGDI K2 key tool.
Update GCDI K2 key tool to latest version to enable NXP NCF29Ax smart key cloning function.
Instruction:
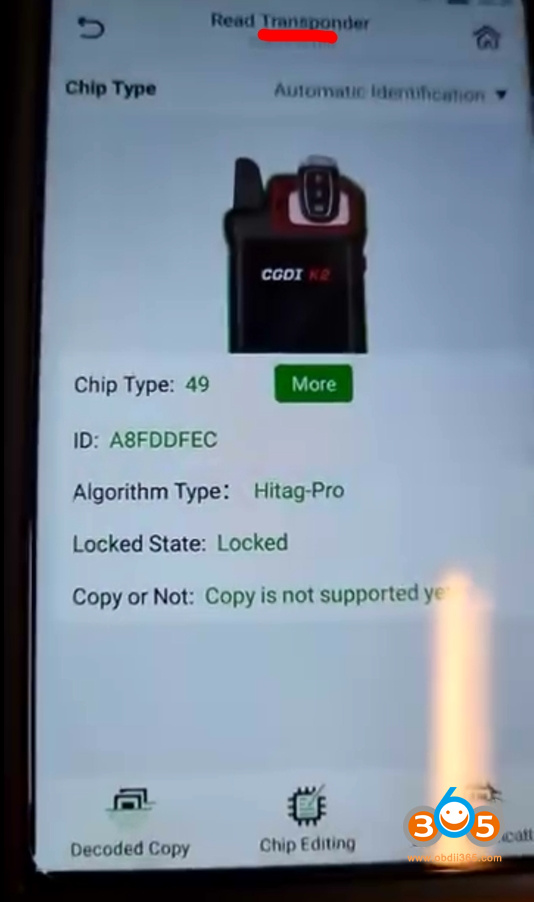
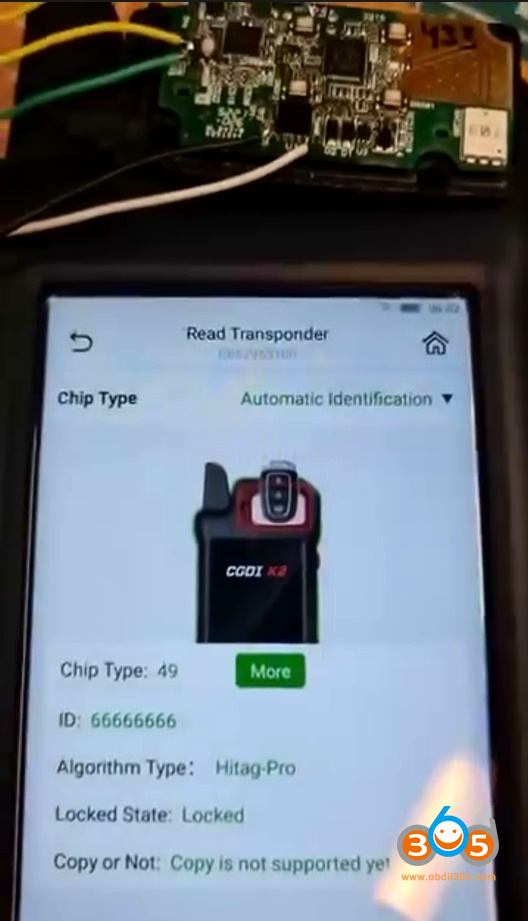
Read original key information.
You can see chip type, ID and locked status.
Disassemble the original key shell.

In CGDI K2 go to Land rover Smart Key Cloning function.
Check key wiring diagram.
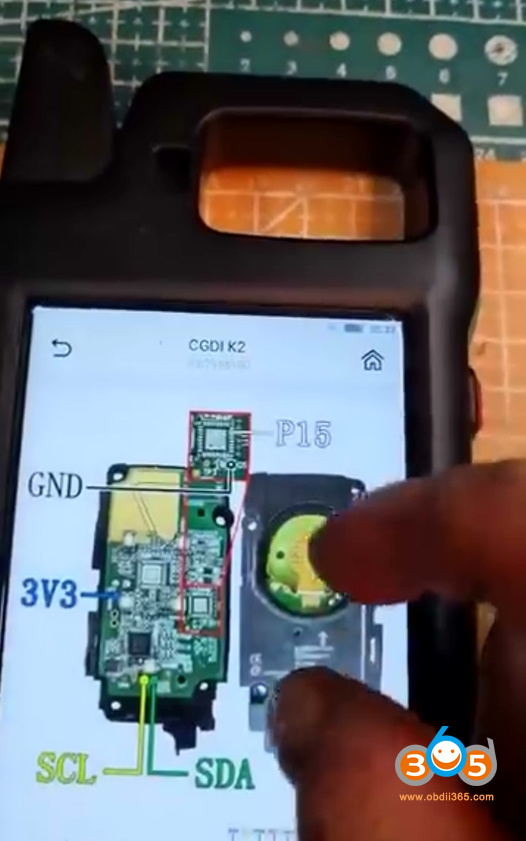
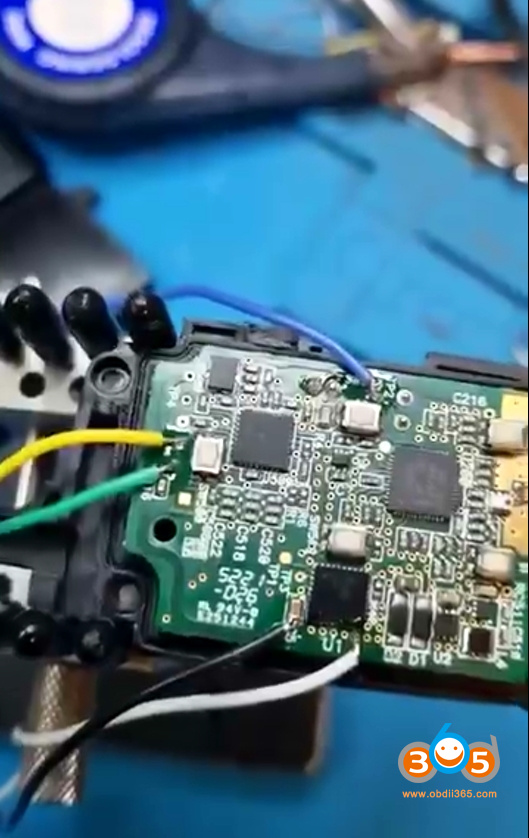
Solder wires on the key using CGDI K2 renew cable.
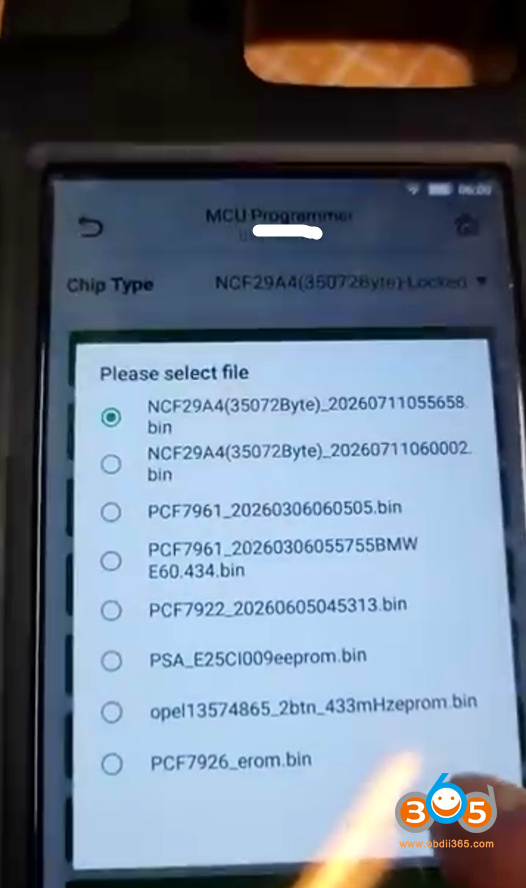
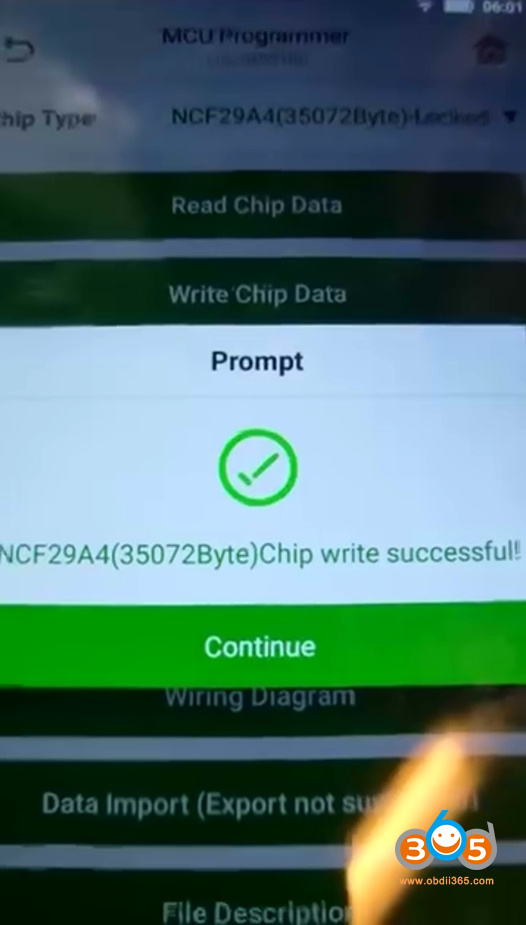
Go to MCU programmer function.
Select Chip type: NCF29A4(350728 byte) locked.
Read key chip data.


Desolder the key.
Solder wires to the new key to be copied.
Then upload original key data and write data to the new key.
CGDI K2 also gives you an option to modify key ID to match the original system.

Write key data successfully. Copy key completed.
Read the copied key information.


